Connecting to: Axia
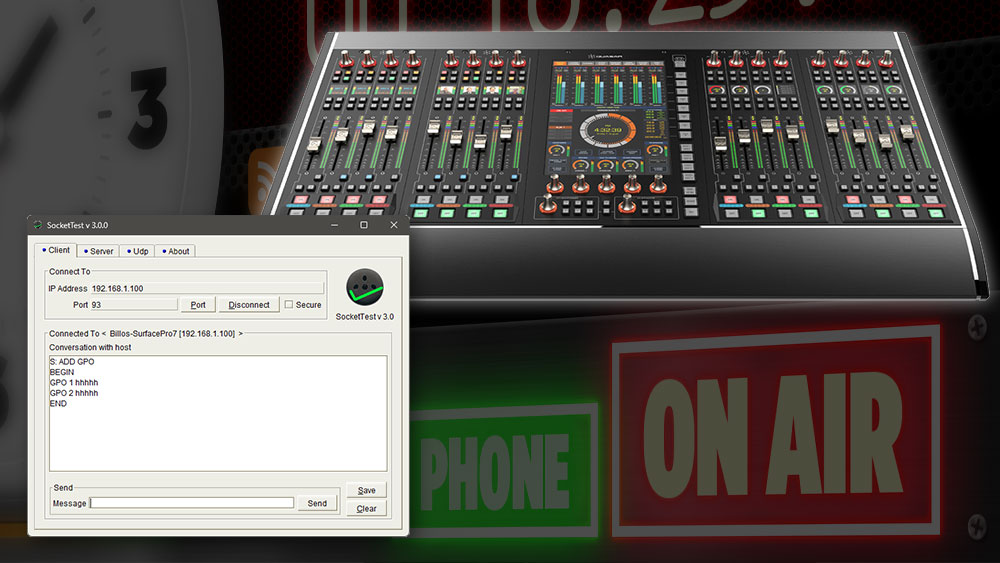
In this guide, we will go through steps to connect directly to Axia units to get current statuses and subscribe to changes to General Purpose Input Outputs (GPIO).
This guide is applicable to v1.1.0 of the app or greater.
Axia units have built in General Purpose Input Outputs (GPIO) ports which can be programmed to respond to certain events and triggers to change the status of the output ports. These are usually used as a physical contact closure to turn on/off lights outside studios or other various things needed.
The Screenabl app can connect directly to the unit and get the current status of any port as well as subscribe to any change events that occur.
Note: This guide assumes that you already have knowledge of how to configure Axia units to enable the GPIO outputs as desired. This guide will not go into any information about that aspect of setup.
Testing to see what is coming out.
Before adding configuration to Screenabl it's best to know what commands are coming in & out of the Axia unit. We think it's best to use a 3rd party application and send commands to the Axia unit and see what is coming back when changes to the GPIO ports are detected.
We recommend a simple app called SocketTest which allows you to connect to the unit and send text commands to it to subscribe to GPIO ports and see the status and change events in real time. Alternatively If you don't want to use that particular application PuTTY can also be used in a "RAW" connection type. For this guide, we will be using SocketTest as we feel it has a better UI.
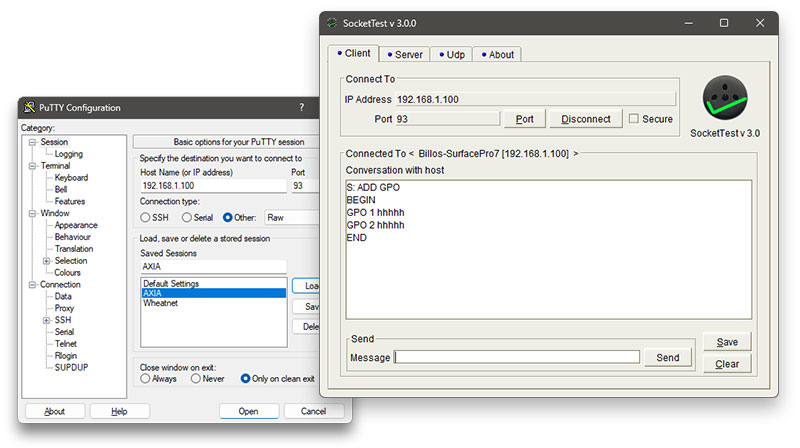
Connecting to the Axia unit.
To connect to the Axia unit you have to be on the same network and the unit must be reachable. You can test this by doing a simple ping test if needed.
We recommended that you do this test on the same machine that will be running Screenabl so that you know that you won't have network/connection issues when using the Screenabl app.
- In the "Client" tab add the IP Address of the unit and set the port number to
93. Then press Connect:
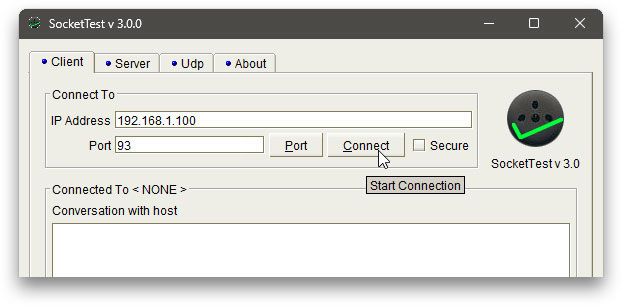
- When you are successfully connected the "connect" button will change to a "disconnect".
Subscribing to an GPIO to get it's status and change events.
Once connected to the Axia unit you can send it an initial command to subscribe to the GPIO ports (there are usually 2 groups of 5 ports)
The subscribe command for Axia is: ADD GPO
- Enter the command into the Message field at the bottom of the SocketTest window and press Send:

You should receive a response back with the current status of each port group:
BEGINGPO 1 hhhhhGPO 2 hhhhhEND
From this point on, your connection is "subscribed" to changes to both port groups, so any changes will instantly be received:
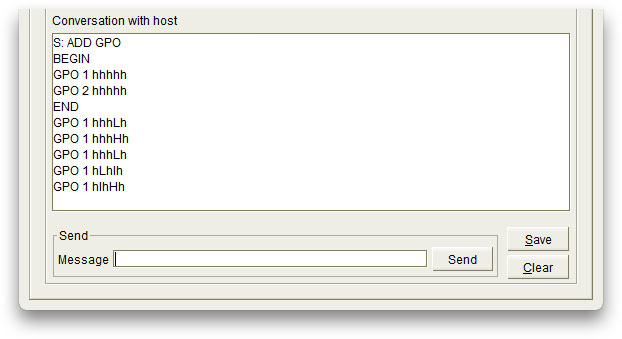
The status message received for GPO groups 1 & 2 each contain the status of the 5 ports. Each port will be will be a h or l (for high and low respectively).
You will see that when a port status changes it sends back all 5 ports for that group, with the port that changed being in capitals rather than lowercase.
Below is an example of port #4 changing to L, back to H, followed by port #2 changing to L:
GPO 1 hhhLhGPO 1 hhhHhGPO 1 hLhhh
Because of the combination of upper and lowercase, when setting up triggers for AXIA units we can't use a simple text string match. Instead we need to use a Regular Expression as outlined below.
TIP: Like GPIO events, you can also subscribe to Mixer events by sending the initial command of MIX. Try it out to see the events which come back.
Configuring Source in Screenabl
Once you have an idea of the events which are received, you can proceed to set up the new source in Screenabl and get it talking to the Axia Unit.
- In the Screenabl settings window, go to Sources and then press the
 button at the top right.
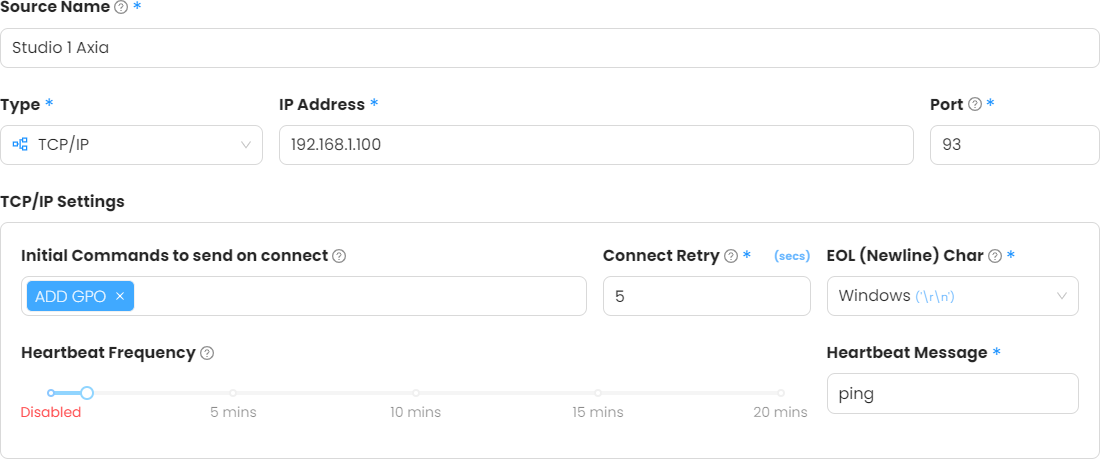
 - Give your new source a Name. This is used throughout the settings window when choosing and connecting to a source, so be sure to make it one you'll recognise (eg/ "Studio 1 Axia").
- Choose "TCP/IP" from the Type dropdown.
- Enter the IP Address of the unit, and set the Port to be "93".
- In the Initial Commands to send on connect input, add
ADD GPO. If you make a mistake you can remove each one by pressing the "x". - It is suggested to set a Heartbeat frequency of 1-2 minutes with Axia units as they have a tendancy to close inactive TCP connections. You can adjust the time period if you need. You can set the Heartbeat Message to any text (just not a subscribe command or reserved word from Axia). We recommend something simple like "ping".
Note: Screenabl automatically reconnects if a connection is closed, but a heartbeat ensures the connection is always open when needed and reduces the chance of incoming events being delayed.
Your new TCP source should look something like this:
- When you are happy with the settings, press the
 button.
Congratulations! Your new Axia source is now configured and ready to be used!
Triggers & Regular Expressions
Because the status events received from Axia units are a combination of upper and lowercase and also contains the status of all the ports in one message, eg/ GPO 1 hhhhh GPO 1 hhhHh GPO 1 hhhLh, the trigger set up requires you to use a regular expression to match just the port you're after (while ignoring others) and both upper & lowercase variants.
For an indepth look, be sure to check out the Regular Expression How-To Guide to get an idea of how Regular expressions work in a lot more detail.
Example Trigger:
This example will be to match the status of GPO 1 Port #4 for a "high" state.
The trigger text would be:GPO 1 ...[hH].
For the trigger above (and any regular expression), the . character is a "wildcard" character and will match any single character (essentially ignoring it). The [hH] portion will match either h or H for that character.
Breakdown of what it's doing:
| Part | What's it doing? |
|---|---|
"GPO 1 " | Matching "GPO 1 " at the start of the string |
. . . | Followed by 3 wildcards characters (ignoring status of port #1, #2, #3) |
[hH] | Followed by either a h or H for the 4th character (port #4) |
. | Followed by a wildcards character (ignoring status of port #5) |
| So triggers for port #4 for both statuses would be: |
| Reg Ex | Will match |
|---|---|
GPO 1 ...[hH]. | Port #4 = High |
GPO 1 ...[lL]. | Port #4 = Low |
Configuring a Trigger
Now that you have your new TCP source set up for your Axia unit, and you are aware that we have to use a regular expression for the trigger, you can set up triggers in lamps or timers.
In the below example we will be editing a Lamp to add triggers to turn it on/off.
- Edit the lamp (or Timer) and click on the Triggers tab.
- Click on the
 button at the top right.
 - Choose your new source from the dropdown list.
- Choose the event you wish to setup from the Trigger Event dropdown.
(eg/ "Turn Lamp On")
5. Select Regular Express from the Command Format dropdown. 6. Paste in the desired Command into the input (eg/GPO 1 ...[hH].)The trigger should look something like this:

This will add a trigger which react to both the initial status returned (lowercase) and any ongoing updates received (uppercase).
- Press the
 button.
To add the "Turn Lamp Off" trigger, you would follow the same steps, choose the different Trigger Event and use the different Command text (eg/ GPO 1 ...[lL].):

Wrapping Up.
You have now added the new source and its initial commands, as well as added triggers to a lamp so it will respond to changes in events when they're received from the Axia unit!
The Screenabl app will only connect to a source if it is used by the current profile. If a lamp is configured to use a Axia unit as a trigger source but the current profile isn't using that lamp, then the app will not connect to the Axia unit. When the app is changed to a profile which uses the lamp, the app will automatically connect to the Axia unit when the profile loads and subscribe to all the events. When the profile is changed again the connection is then closed until it is needed again.
This ensures that any Axia unit you have do not have unnecessary connections to it when it's not required.

